Some tips for fixing that radius:
*Get some large blocks of wood that are exactly the same thickness as the body, & affix the body & the blocks to a perfectly flat surface (like a workbench) w/double stick tape. Make sure the blocks surround the body in such a way that you can move the router around the body & have it supported at all times. These blocks will keep the router from "falling off" the body.
*After setting the router bit, make a few test runs on scrap to make sure that it is running at the perfect depth. Too low & it will cut a channel around the body perimeter. Too high & it won't really cut anything.
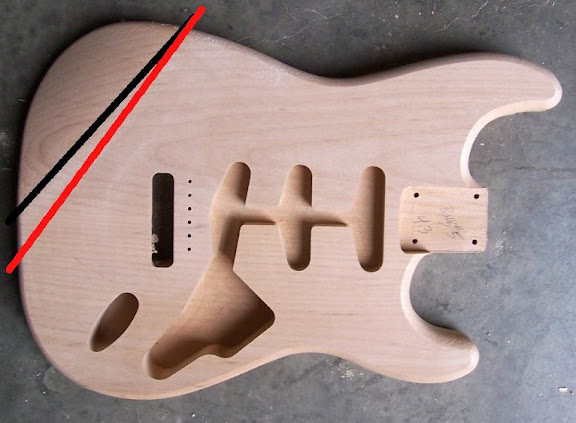
*Difficult areas: ONE- The back of the body where the cutaways meet the neck. This area is kind of tapered by pushing the router into the wood WAY BEFORE THE CUTAWAYS MEET WHERE THE NECKPLATE WILL LAY. If you are not careful you will round over the area & that will be BAD. Here's where you need to be wearing your safety glasses & get down there to eyeball the cut. Don't worry if it's not a "smooth" taper; most vintage Strats aren't very clean in this area & it is one place where the hand-made aspect of older Strats is apparent. Here's a pic of the problem areas:

There should be no problem at all in this same area on the top. Just let the router bit ride into the empty space. The router itself will rest upon the blocks & the body.
Two other problem areas are the rounded edges where the back & forearm contours have been cut from (I'm pretty sire that they rounded the edge before they cut the contours back in the day). There's no wood for the router bearing to ride on so you will definitely cut into the body if you are not careful & that will be another bad thing. You can either sculpt some blocks that fit into these areas to keep the router bearing rolling along the edge, or you can do what I did: Go freestyle & then shape any imperfections in the radius w/a palm sander or a sanding block, & some heavy grit paper. If you are going to do this then you have to move FAST. Be careful not to push into the body or you are screwed. You'll know how Tom Anderson came up w/his nifty "Drop Top" concept. Just move fast while eyeballing it the whole time & keep the bit moving toward the part of the body where there is some wood for the bearing to ride on & you are safe. Always remember that you can sand more wood off if you need to but you can't replace it once it is gone. At least not easily, anyhow.
*After you have the body completely re-radiused, use a piece of sandpaper on a wide block to make sure the surface is flat. Then gently sand the radius. I go back over the top again lightly after that to give it kind of a "crisp" look. You don't want an abrupt edge like you see in that first pic you posted (that's a raw body w/very little finish sanding done), but you want a smooth transition, & you want it to be as consistent as you can get it around the entire edge. Sloppy work here gives the body an uneven & amateurish look & is a dead giveaway that a guitar has been refinished. That's one of the things the big boys look for to indicate if the finish is original on a vintage guitar. After all, you want the thing to look "store-bought".


 Reply With Quote


