Results 1 to 40 of 40

Thread: Shaping neck to proper Strat headstock

  1. #1
    Forum Member
    Join Date
    Jul 2008
    Posts
    46

    Shaping neck to proper Strat headstock

    I have searched this fine subsection here at TFF for info on clone necks. I have gotten great info on this and wanted to report on a work in progress.

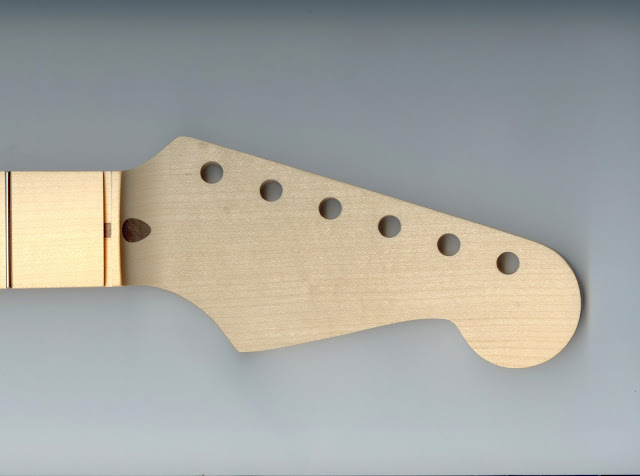
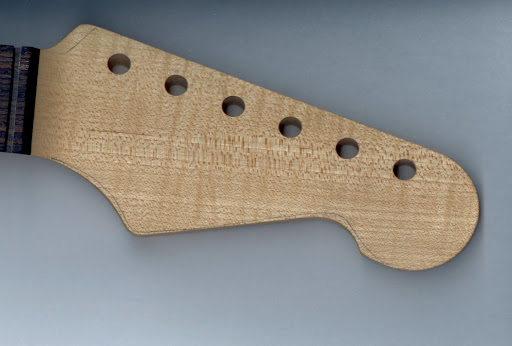
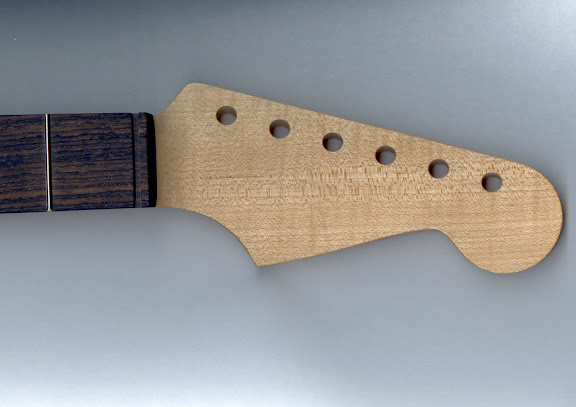
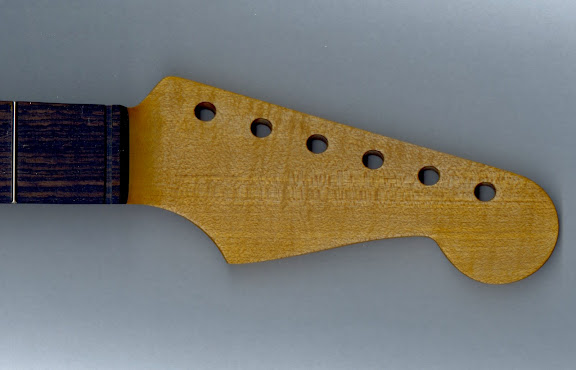
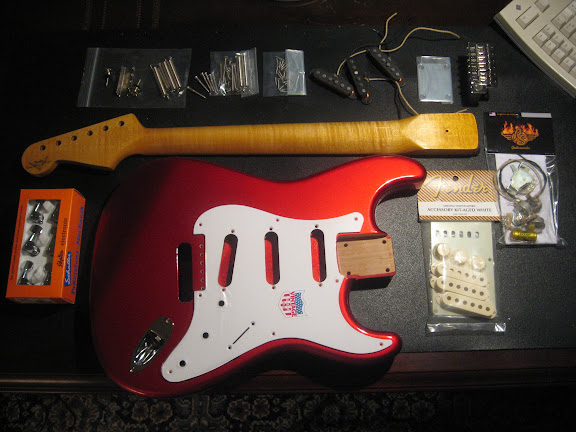
    The neck I'm working on is a USACG neck in 1/4 sawn maple with a rosewood board. I had tried some of the postings for CAD drawings and 1:1 pictures to trace onto the headstock but met little sucess. I couldn't get the precision needed in these makeshift templates to make it work. So I simply traced the headstock from my boatneck onto carboard and retraced onto the new neck.

    The photo shows how little needs to be trimmed from the legal shape of the USACG headstock. There is just barely enough wood there to make a good, accurate Strat headstock.

    On the other hand, there was far too much wood in the stock headstock thickness. Much work to plane from about .590 to a more correct .540.

    I also re-profiled the neck somewhat, but that's another story. Thanks for reading.

  2. #2
    Forum Member phantomman's Avatar
    Join Date
    Aug 2007
    Location
    Ten miles from the Mexican Frontier, in Arizona
    Posts
    7,309

    Re: Shaping neck to proper Strat headstock

    Lookin' good, Carbonti!

    Was the excess thickness removed from the front or the back of the headstock?

    I love the look of Ľ-sawn maple!


  3. #3
    TFF Stage Crew
    Moderator
    Cogs's Avatar
    Join Date
    Jul 2002
    Location
    Burpleson AFB
    Posts
    6,998

    Re: Shaping neck to proper Strat headstock

    Excellent! FWIW I would leave the extra wood that's on the bass side of the headstock, but thats just me. The french curve & the ball, though, looks like your gonna hit it dead on!
    These are two USACG necks I did, & a '59 on the right. The '59 gave me the template for the clones. Don't forget to sand the "curve" onto the rosewood/maple seam!

  4. #4
    TFF Stage Crew
    Moderator
    Cogs's Avatar
    Join Date
    Jul 2002
    Location
    Burpleson AFB
    Posts
    6,998

    Re: Shaping neck to proper Strat headstock


  5. #5
    Forum Member phantomman's Avatar
    Join Date
    Aug 2007
    Location
    Ten miles from the Mexican Frontier, in Arizona
    Posts
    7,309

    Re: Shaping neck to proper Strat headstock

    Day-amm schweet! An' tha's some mighty fine rosewood on the fretboard as well!


  6. #6
    Forum Member
    Join Date
    Mar 2007
    Location
    southwest georgia. the state.
    Posts
    1,640

    Re: Shaping neck to proper Strat headstock

    Quote Originally Posted by phantomman View Post
    Lookin' good, Carbonti!
    phantomman, the first time i saw that post, i busted out laughing thinking you called him a cabron

  7. #7
    Forum Member Stonefreefuzz1's Avatar
    Join Date
    Feb 2008
    Location
    Freehold, New Jersey
    Posts
    1,702

    Re: Shaping neck to proper Strat headstock

    lol. Lookin good, I reallly love the 1/4 sawn maple, looks friggin' killer!
    RIP Lacey Cat 1992-2009

  8. #8
    Forum Member
    Join Date
    Jul 2008
    Posts
    46

    Re: Shaping neck to proper Strat headstock

    Quote Originally Posted by phantomman View Post

    Was the excess thickness removed from the front or the back of the headstock?
    From the back. I measured the step from the fretboard to the headstock face on the treble-side at .400 which matches up OK with the other necks so the back was block sanded. I wouldn't have even attempted it if it were front-side, re-radiusing the waterfall step for a lower face and having it look OK - not a chance!

    71818: Your headstocks are fantastic. Funny how the curve between the ball and french curve vary when the old pictures are reviewed. I like your original '59 in this better than mine. Not sure I can curve the rosewood/maple seam on mine, there isn't enough rosewood extending north of the nut. I gotta take a little off the bass, the angle is wrong and it's too close to the nut.

    With the dimensions as closely cropped as they are, I'm not sure tracing a current Fender reissue would even fit the available wood on the USACG. Those new Fenders just look funny to me, the ball is oversized and the french curves too curvy.

  9. #9
    TFF Stage Crew
    Moderator
    Cogs's Avatar
    Join Date
    Jul 2002
    Location
    Burpleson AFB
    Posts
    6,998

    Re: Shaping neck to proper Strat headstock

    I hear what you are saying- The step, or "waterfall" you are talking about is much shallower on my necks, so it was easier to sand that curve in. But as I said before- you've got the ball & the curve down.
    Are you going to use a Dremel to do the shaping?
    Let's see it when you are all done & have it assembled!

  10. #10
    Forum Member phantomman's Avatar
    Join Date
    Aug 2007
    Location
    Ten miles from the Mexican Frontier, in Arizona
    Posts
    7,309

    Re: Shaping neck to proper Strat headstock

    Quote Originally Posted by carbonti View Post
    From the back. I measured the step from the fretboard to the headstock face on the treble-side at .400 which matches up OK with the other necks so the back was block sanded. I wouldn't have even attempted it if it were front-side, re-radiusing the waterfall step for a lower face and having it look OK - not a chance!

    71818: Your headstocks are fantastic. Funny how the curve between the ball and french curve vary when the old pictures are reviewed. I like your original '59 in this better than mine. Not sure I can curve the rosewood/maple seam on mine, there isn't enough rosewood extending north of the nut. I gotta take a little off the bass, the angle is wrong and it's too close to the nut.

    With the dimensions as closely cropped as they are, I'm not sure tracing a current Fender reissue would even fit the available wood on the USACG. Those new Fenders just look funny to me, the ball is oversized and the french curves too curvy.
    Well it seems as though USACG left just enough meat to allow the headstock to be shaped into a proper 50's/60's shape. But woe be to anybody who hoped to build a CBS "fat head" outta one o' these necks.

    It's comin' along right nice......post more pics as the build progresses if you can.


  11. #11
    Forum Member
    Join Date
    Jul 2008
    Posts
    46

    Re: Shaping neck to proper Strat headstock

    With the amount of wood as trivial as on the neck pictured, I'll simply hand or block sand the contours in. The curvy parts I'll wrap sandpaper around a deep socket of the appropriate dimension and shape by hand. 220 grit eats through rock maple very easily.

    BTW, I also recontoured the back from a soft "V" to a medium "V", took lots of shoulder off the neck. Shoulda ordered the medium "V". I didn't want to send it back and shaping it myself would allow me to tailor the feel. But it's like tailoring your own suit of clothes and then trying it on, taking it off, sewing and repeating 1,000 times. Crazy.

    I'll certainly post pics of the neck and all of the work in progress so you guys can see the pieces. As I plan to nitro the neck, the finished guitar won't be eligible for final assembly for a few months.

  12. #12
    TFF Stage Crew
    Moderator
    Cogs's Avatar
    Join Date
    Jul 2002
    Location
    Burpleson AFB
    Posts
    6,998

    Re: Shaping neck to proper Strat headstock

    Quote Originally Posted by phantomman View Post
    But woe be to anybody who hoped to build a CBS "fat head" outta one o' these necks.
    Oh, they do one of those, too

  13. #13
    Forum Member phantomman's Avatar
    Join Date
    Aug 2007
    Location
    Ten miles from the Mexican Frontier, in Arizona
    Posts
    7,309

    Re: Shaping neck to proper Strat headstock

    Quote Originally Posted by 71818 View Post
    Oh, they do one of those, too
    Wonder how many of them they sell vs the "reg'lar" version?

    Ever' once in a while I think about cloning a '67 or a '68. But then I think about that USS Nimitz-sized headstock an' the leetle voice in my haid sez "NAW.......!"


  14. #14
    TFF Stage Crew
    Moderator
    Cogs's Avatar
    Join Date
    Jul 2002
    Location
    Burpleson AFB
    Posts
    6,998

    Re: Shaping neck to proper Strat headstock

    The very first Strat I ever considered buying was a '65 Sunburst at Melody Music in Ft. Collins, CO. I didn't buy it because of the small heastock. It wasn't like the ones Jimi played!
    Last edited by Cogs; 08-08-2008 at 08:34 PM. Reason: speling correction

  15. #15
    Forum Member phantomman's Avatar
    Join Date
    Aug 2007
    Location
    Ten miles from the Mexican Frontier, in Arizona
    Posts
    7,309

    Re: Shaping neck to proper Strat headstock

    I reckon we've all been stoopid in that regard.

    In '77 I passed on a used but dead-mint '71 Jazz Bass (CAR, with white "tuxedo" neck) for $165 at a pawn shop in Anniston, Alabama simply 'cause it didn't have the original HSC.


  16. #16
    Forum Member
    Join Date
    Jul 2008
    Posts
    46

    Re: Shaping neck to proper Strat headstock

    As this was the first time I had done any work on a clone neck, it was an education. How did I come to believe a neck could preped simply sawing the anti-Fender-lawyer lip off the headstock and be done? The work done so far:

    a) Block sand about 2mm from the back of entire headstock because it's too thick
    b) Recontour the back of the neck from soft to medium V.
    c) Trim the headstock to proper vintage shape
    d) Contour the back of the headstock and adjust the curves for how they transition into the neck
    e) Round off the end of rosewood board


    Tommy and the guys at USACG always go the extra step. The neck ordered was 1/4 sawn maple. In wiping this neck down with naphtha, there seems to be some nice flame in this neck. So I'll try some very diluted Vintage Amber dye directly on the wood and sand it back before sealing with nitro to bring out the flame.

    Not having completed an unfinished neck before, I can see the attraction of DIY. While it's bare wood, you can tweak a neck to look & feel anyway you want. For example, I rolled the fretboard edges with the barrel of a screwdriver but it wasn't enough. So I got the feel I wanted with a few swipes of 220 grit on the fretboard edge. Now this neck will play old from new.

    So far so good on this project. Thanks for reading.

  17. #17
    TFF Stage Crew
    Moderator
    Cogs's Avatar
    Join Date
    Jul 2002
    Location
    Burpleson AFB
    Posts
    6,998

    Re: Shaping neck to proper Strat headstock

    I saw those flames peeking through in the first pic you posted. They'll pop out when you put a finish on that sucker.
    Looking real good so far! Just a couple suggestions: Put a little more "S" in that french curve, & install the nut BEFORE you spray the neck.

  18. #18
    Forum Member
    Join Date
    Jul 2008
    Posts
    46

    Re: Shaping neck to proper Strat headstock

    Yes, you are correct about adding slightly more "S" into the french curve. Thanks for the comments, it's always a help to have a second opinion with a critical eye.

    Doing this "S" shaping stuff, the boderline for a mistake is no more than 2 extra passes with the sandpaper.

  19. #19
    Forum Member phantomman's Avatar
    Join Date
    Aug 2007
    Location
    Ten miles from the Mexican Frontier, in Arizona
    Posts
    7,309

    Re: Shaping neck to proper Strat headstock

    Quote Originally Posted by 71818 View Post
    I saw those flames peeking through in the first pic you posted. They'll pop out when you put a finish on that sucker.
    Looking real good so far! Just a couple suggestions: Put a little more "S" in that french curve, & install the nut BEFORE you spray the neck.
    I concur. Also, mebbe a skosh smaller on the radius where the french curve meets the "ball".

    Lookin' mighty schweet!


  20. #20
    Forum Member
    Join Date
    Jul 2008
    Posts
    46

    Re: Shaping neck to proper Strat headstock

    The neck-work in progress is now at the following:


    I was targeting a headstock shape slightly narrower than a '60's headstock, as seen in the following pic of a '57. (Courtesy of link to photo at Strat Collector News). Well, this is the end of line for shaping the headstock as I don't want to take anymore wood from the shape.


    As I wanted to bring out the flame in the neck, it has had a fairly heavy application of Vintage Amber and then sanded back to the color seen here. There isn't yet any lacquer on it - just bare wood & dye so I don't know how much stripe will emerge when nitro'd. I may not apply any more dye after a sealing coat of nitro, this color looks OK to me. Also as I'm not trying to replicate a vintage neck there isn't an authentic color target. With a 12" fretboard radius and 22 frets, this neck ain't no '57.

    For those you who have done this - How much darker does the color get after it's been shot with clear? I'm asking because I'd rather not find it too dark after shooting when I have the chance to sand back more dye now while it's bare wood. Oh well, maybe I'll just wing it, that's been the M.O. till now anyway. Thanks for reading.

  21. #21
    TFF Stage Crew
    Moderator
    Cogs's Avatar
    Join Date
    Jul 2002
    Location
    Burpleson AFB
    Posts
    6,998

    Re: Shaping neck to proper Strat headstock

    It will get somewhat darker after shooting clear; how much is hard for me to say. I can't give you any scientific answer, lol.
    I usually tint my clear on the lighter side. I know it will always yellow & darken over time but you really can't lighten it up once it's on there.
    All I can say is that if it were my neck I'd go lighter & try to hit the shade that you see on the '57 neck we're looking at.

  22. #22
    Forum Member phantomman's Avatar
    Join Date
    Aug 2007
    Location
    Ten miles from the Mexican Frontier, in Arizona
    Posts
    7,309

    Re: Shaping neck to proper Strat headstock

    Gee, that's really lookin' swell! Frankly, I wouldn't add any more artificial tint to it -- I think the natural effects of aging an' the elements will look far more authentic than adding another tinting coat. I'd go with one more very thin coat of clear lacquer only to seal the "neat headstock accessory" (assuming you are gonna apply one), then git started on the body.

    Tha's a real schweet job you got there, Carbonti!


  23. #23
    Forum Member
    Join Date
    Jul 2008
    Posts
    46

    Re: Shaping neck to proper Strat headstock

    Quote Originally Posted by phantomman View Post
    I'd go with one more very thin coat of clear lacquer only to seal the "neat headstock accessory"
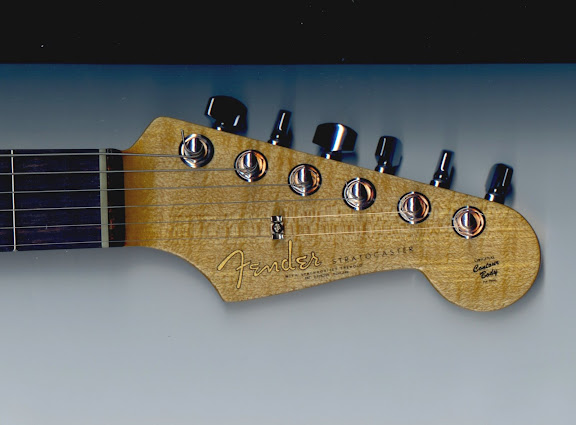
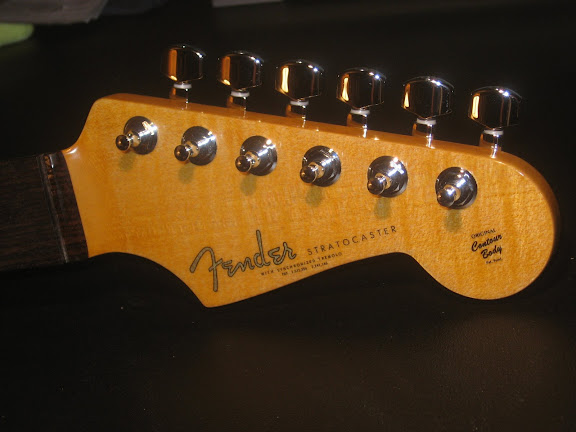
    Whatever might that be?!? But I'm in agreement as the plan is to bury the "headstock accessory" beneath the nitro. To get it to look seamless will take many layers. I gotta admit on taking a shortcut with the body, this neck is going on a '02 CIJ alder body in CAR. At the time, I didn't feel the nerve to also finish a body. However, seeing 71818's FR posting gives me GAS.

    Also have sanded the neck back further as per 71818's advice. Doing this accentuates the flame further and allows better options on color i.e. easier to add more than take away.

    Both of you gentlemen have been very gracious with your sound advice on this. Danka.

  24. #24
    TFF Stage Crew
    Moderator
    Cogs's Avatar
    Join Date
    Jul 2002
    Location
    Burpleson AFB
    Posts
    6,998

    Re: Shaping neck to proper Strat headstock

    If you want to make it vintage style the headstock accessory would be on top of the lacquer.
    IMO, finishing a body is WAY easier than doing a neck. There are virtually no sharp edges to sand through like on a headstock & that's where all the difficulty lies. You lay on a few coats & then knock it back w/some wet/dry paper & then lay on a couple more. If you are not careful then you'll sand off the lacquer on the edges, necessitating more lacquer coats on the headstock. Then you end up w/a really deep layer on the face & back of the headstock. Some like the look but not me. Over time it dries unevenly & looks wavy, even though the surface itself may be a high gloss. You want your lacquer to look like cellophane wrap has been stretched perfectly over the wood, kind of like shrink-wrap.
    So make sure you use a block when doing the face of the headstock, & check your progress frequently!

  25. #25
    TFF Stage Crew
    Moderator
    Cogs's Avatar
    Join Date
    Jul 2002
    Location
    Burpleson AFB
    Posts
    6,998

    Re: Shaping neck to proper Strat headstock

    BTW- you've gotten that shape dead-on. Excellent!

  26. #26
    Forum Member phantomman's Avatar
    Join Date
    Aug 2007
    Location
    Ten miles from the Mexican Frontier, in Arizona
    Posts
    7,309

    Re: Shaping neck to proper Strat headstock

    General Ripper is indeed correct -- the "NHA" should reside on top of the lacquer coat(s) for total authenticity. For the sake of practicality though, any decal needs a sealer coat to prevent it from succumbing to the effects of time an' the elements.

    This Jazz Bass is the only headstock I've done (to date) an' after applying the NHA an' letting it dry for 48 hours I airbrushed a very light coat of clear lacquer over the entire face of the headstock.


    The neck (Allparts BTW) came pre-finished with a light amber tint although it is a skosh darker than this photo depicts. In person, the NHA's carrier film is just barely noticeable, with the prototypical "step" visible when viewed edge-wise. I'm pretty happy with the way it turned out an' my brother loves it (was a birthday gift).

    HTH

  27. #27
    Forum Member
    Join Date
    Jul 2008
    Posts
    46

    Neck and a bunch of parts

    Progress with this neck is moving along slowly. Spraying nitro on this neck is a learning experience for sure. A fair amount of effort has been spent correcting mistakes so it's been like finishing a neck twice, or maybe three times As this guitar makes no pretense of vintage correctness, the decals to this headstock will be buried. Heck, while I'm spraying, I might as well just keep on spraying. Man, this nitro stuff, airplane glue was never like this and I spray outside, wow

    I took inventory of all the parts for this build. The neck is the piece holding up the works. Even after it's done, it'll be a month or so to cure the nitro before final sanding & compounding. Hope it's worth it.


  28. #28
    Forum Member phantomman's Avatar
    Join Date
    Aug 2007
    Location
    Ten miles from the Mexican Frontier, in Arizona
    Posts
    7,309

    Re: Shaping neck to proper Strat headstock

    Holy chit, Carbonti......that looks like the CAR clone I got goin' right now. I love them flames on the maple -- very classy!


  29. #29
    TFF Stage Crew
    Moderator
    Cogs's Avatar
    Join Date
    Jul 2002
    Location
    Burpleson AFB
    Posts
    6,998

    Re: Shaping neck to proper Strat headstock

    Beauty!
    You're right; there's no hurry to buff out the nitro.

  30. #30
    Forum Member phantomman's Avatar
    Join Date
    Aug 2007
    Location
    Ten miles from the Mexican Frontier, in Arizona
    Posts
    7,309

    Re: Shaping neck to proper Strat headstock

    Absolutely......let that nitro fully out-gas an' cure before the final rub-down an' buffing.

  31. #31
    Forum Member
    Join Date
    Jul 2008
    Posts
    46

    Headstock complete, beauty in the buffing...

    This poor neck has borne the brunt of all my rookie mistakes, but it has made it to the finish for this stage. Working on completing the nitro finish on this has taught me about 3 important elements:

    1) Sandpaper in acending grits (400 800 1000 1200) is your best friend
    2) Imperfections in the finish are magnified greatly during final gloss polishing so cutting corners will never be hidden
    3) buffing wheel burns through nitro in the blink of an eye


    The headstock is as smooth as glass with the decal buried, it was very satisfying to get that part done almost flawlessly. But I know where every hiccup is on this neck, and there are lots of 'em - as a reknowned bike builder says "Perfection is Imperfection".

  32. #32
    Forum Member phantomman's Avatar
    Join Date
    Aug 2007
    Location
    Ten miles from the Mexican Frontier, in Arizona
    Posts
    7,309

    Re: Shaping neck to proper Strat headstock

    Quarter-sawn an' flames......wha's not to like?

    It's gorgeous IMO. An' a nice job with those "NHAs"......looks like the 'real McCoy'.

    "When injustice becomes law then rebellion becomes duty."

  33. #33
    Forum Member
    Join Date
    Jul 2008
    Posts
    46

    Re: Blowing the nut

    This neck has been a tremendous pasttime for me as there is nothing on this neck that hasn't be done, screwed up, and redone repeatedly. But this is a supremely addicting thing to do and there are already plans for more ambitous guitars to do next (mahogany tele w/humbuckers).

    In fitting a nut, I learned about the phrase "blowing the nut" which I then had to experience for myself. 
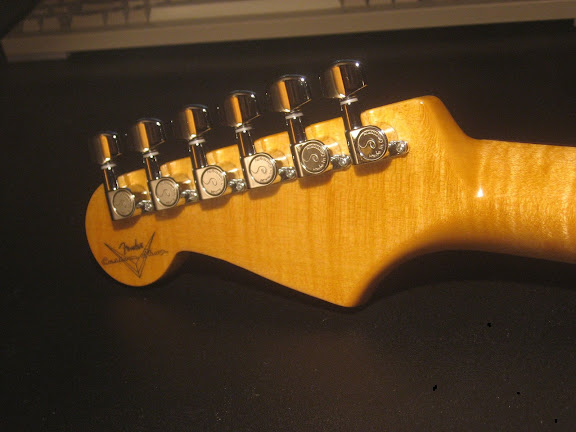
Basically, installing my hand crafted bone nut with a cut too far into the nut so the G string buzzes on the first fret. Oh well, I need the practice in making another one anyway.

    One thing found to be invaluable for starting the nut is to use a #13 xacto micro saw blade to lightly notch the nut so it will hold the strings and allow the alignment to be checked. I prefer to space the strings so they are equidistant between the actual strings rather that equidistant as measured to the string centerline - the neck position markers then don't run exactly between the G & D strings but shade more towards the D.

    This started as a simple task of getting a neck ready to be made playable. For me, it was anything but simple. The options, possibilities and control over a project like this can just draw you down the rabbit-hole. Fantastic.


    The guitar is not finished, it's a pickup & trem cavity routed acoustic at this point. I'll post to a new thread the completed strat when completed. Thanks for reading.

  34. #34
    Forum Member phantomman's Avatar
    Join Date
    Aug 2007
    Location
    Ten miles from the Mexican Frontier, in Arizona
    Posts
    7,309

    Re: Shaping neck to proper Strat headstock

    Looks like yer off to the races......

    Git that body done!

    "When injustice becomes law then rebellion becomes duty."

  35. #35
    Forum Member Stonefreefuzz1's Avatar
    Join Date
    Feb 2008
    Location
    Freehold, New Jersey
    Posts
    1,702

    Re: Shaping neck to proper Strat headstock

    Carbonti...that is NICE!
    RIP Lacey Cat 1992-2009

  36. #36
    Forum Member
    Join Date
    Jul 2008
    Posts
    46

    Re: Shaping neck to proper Strat headstock

    Another minor setback and par for the course for my skill as a builder - the finish around the neck pocket was chipped while reworking the neck pocket. So a little lacquer repair is bumped to the top of the work list on this build.

    The neck heel profile was a slightly different radius than the neck pocket so the fit could be improved upon. In sanding the pocket in fine tuning the neck fit I chipped two spots. Fixable but now more time added to the process before completion. An instant gratification activity, this is not! I started this thread in August, good grief.

    Undeterred. Onwards.

  37. #37
    Forum Member phantomman's Avatar
    Join Date
    Aug 2007
    Location
    Ten miles from the Mexican Frontier, in Arizona
    Posts
    7,309

    Re: Shaping neck to proper Strat headstock

    Hang in there, Carbonti.

    If'n this were easy, ever'body would be doon it.

    "When injustice becomes law then rebellion becomes duty."

  38. #38
    Forum Member
    Join Date
    Jul 2008
    Posts
    46

    Re: Shaping neck to proper Strat headstock

    Thanks for the words of encouragment.

    This is not the first time I've built from parts. The difference is the first time my idea of building a guitar was simply if it bolted together and parts fit, well I was good.

    Now I know better and know little bit more, although it may seem at times a detriment. The world is full of half-assed stuff pawned off to the unknowing masses, couldn't foist junk on myself from my own hand!

    All tuition up the learning curve.

  39. #39
    Forum Member
    Join Date
    Jul 2008
    Posts
    46

    Another Neck whilst Repair some more

    This Strat CAR project isn't finished yet and it's not dead yet either. To borrow a line from Zep, "can't quit so I'm gonna put it down for a little while". I obliquely leaned the axe against my desk and it fell onto its backside. The guitar cable plug it landed on took a chunk out of the finish. Don't have silver undercoat and translucent red to repair a CAR-colored wound so Ducati red touchup paint and a nitro drop fill would have to do. The original finish is poly. The gouge was deep so there was a lot of lacquer added to level it out and much time to cure the patch. It sanded and polished out OK.


    This will get wired up shortly, in the meantime I play it acoustically. This Strat has the right wood and rings pretty nicely all by itself. If it sounded like a dud I would have quit on it long ago.

    Also started another USACG neck. This time I drew the cut lines with a compass rather than tracing an existing headstock. The Duchossoir book has a blueprint drawing of the headstock and the french curve radii are listed. It's accurate enough to get in the ballpark.


    There was so much variation in vintage Strat headstocks that anything close would be accurate enough. I'll pair this neck with this USACG alder Strat body:


    Plan to finish this in a brown burst, similar to the guitar shown in this old Fender CS photo.


    Thanks for reading.

  40. #40
    Forum Member phantomman's Avatar
    Join Date
    Aug 2007
    Location
    Ten miles from the Mexican Frontier, in Arizona
    Posts
    7,309

    Re: Shaping neck to proper Strat headstock

    That alder body has nice enough grain that I bet it would take a MK blonde finish pretty well.

    Jus' sayin'......

    Lumber on the new neck looks swell too -- that head stock appears dead-on to my eye!

    "When injustice becomes law then rebellion becomes duty."

Posting Permissions

  • You may not post new threads
  • You may not post replies
  • You may not post attachments
  • You may not edit your posts
  •